Tuesday, October 21, 2014

My First Christmas Card!

I just got home from a long four day weekend retreat. I love getting away with my scrappin buddies with nothing to do other than fellowship, eat, and crop. I didn't get a lot done. I rarely do. I know a lot of gals that are organized, prepared, and make tons of pages. Not me. I love to go and if I get something made that's fine. If not, that is fine too. I did get a few things checked off my small list. I linked all of my Cricut cartridges to my new Explore, I worked on a pennant frame for my oldest Grand, I made a card for my Design Team The Fruit of My Hands, and worked on two projects for my upcoming class next weekend.

My main focus for this card was using the Memory Box Cabrini Ornament Die. I used the Pink Paislee Merry & Bright paper collection, along with a little bit of paper piecing using some off white, green, and black papers from my stash for the die ornament. To finish the card I added a piece of black and cream twine, a random stamp, and some clear Wink of Stella to the leaves and holly. I hope you enjoy my card! Thanks for visiting my blog. Make sure to check out Linda's online store and "like" her Facebook page. While there, check out everything she has in stock. If you don't see what you are looking for, just email her and ask if she can get it for you. Enjoy!

Happy Scrappin.....Cheryl


Monday, September 8, 2014

It's time to go "Back to School!"

Well, I finally decided to jump head first into starting back with my Close To My Heart scrapbooking class. When I lived in Alabama I held my class each week, but I am just too busy now with my Grands to even consider that. Once a month will have to be my new schedule. I had my first workshop on August 31st and had five ladies attending with an additional four kits ordered. I was tickled and excited! For my first class I used the Close To My Heart's  "Chalk It Up" collection for a "Back to School" two page layout. I know the trend is to use one to two pictures per page, but our family takes tons of pictures and I am tired of only viewing them on my computer. I created my class layout to make the most out of using a large number of pictures.


I had a hard time trying to get a good picture of both pages. I normally use Picasa for my photo editing, but it crashed while we were at the beach in June. Until I either get a new computer or figure out how the crash happened, I am stuck.

On both of my pages I used the Close To My Heart  Art PhilosophyArtbooking, and Artiste Cricut cartridges to cut the number boarder, photo corners, and my die cut images.  I also used several of our clear stamp sets; Great Job, School Years, and Reel Life. My three Exclusive inks used were Black, Lagoon, and Sorbet. I was able to get six pictures on each page. This can decrease or increase depending on number of pictures needing to be used on the layout. For someone not having as many pictures, they can use sections of the paper collection in place of a picture. I also included my Grands class information and asked her to sign her name. Without documenting this info, sadly most of it can be forgotten over the years. I also suggest to always sign and date the back of your artwork. 


If you don't have a Close To My Heart Consultant, I would love to be your consultant. Please visit my website here

Now to get busy and start planning my September class.

Happy Scrappin! Cheryl

Tuesday, July 1, 2014

Projects From Years Past & My First Card I Ever Made.....

Wow...my poor neglected blog. Sitting here tonight drinking way too much sweet tea.....tea that between the sugar and caffeine you cannot possibly go to sleep! So I am cleaning things off my computer. I have had computer issues since we went to the beach. Some days it seems better, but like tonight it is sad. I actually have two computer issues... I let two six years old have their hands on it for a week while on vacation. Dumb me. Who would have thought they would find so much to click on instead of their online games? The other thing is my computers memory is maxed out...totally. I have maybe 5% left and keep forgetting to use my new external hard drive. We both have memory problems! lol

Anyway..cleaning out things as I go and found an old scrap booking site I used to frequent all the time. Way before Pinterst. I had a blast looking at my old projects. Back then I was a huge scrapper and was not doing cards...faint..faint! Anyway, I thought I would post a hand full of my old pages and the first ever card I made. It was fun to revisit these pages. Are you ready? Here we go!


Here are the first few cards I made.  The first card was before I discovered Copics.


This card was for my Mom. One of my first fancy cards. Honestly, not much of a fancy card maker anymore I don't think..... Plus I now love stamped images and not just a verse. I still love this card. I also can see now the bow was WAY too big, but she loved it!


Probably one of the first cards I made for my husband. Afterwards I thought it looked too feminine, but Rick said no he loved it like it was. Sweet man! Now I look back at it again and say yes, it was too feminine..and the music notes were upside down and I took band in school and should have noticed this prior to adding the sentiment to the front.....lol


This was the first card I ever made. I was sooo proud and happy about it. I made it for my sweet Mom. I rarely make a card like this anymore. Hmmm maybe I need too revisit using embossing powders.


There were more of my projects on the site, but I am just too sleepy to upload anymore. This was fun finding older projects and cards. 

Happy Stampin......Cheryl


Friday, March 7, 2014

Fruits, Veggies, and Water

I am looking through several posts on my Facebook page tonight and found this YouTube video by Aktuelles aus der Kartenwerkstatt. Today is my first day on Weight Watchers and of course all I can think about is food that I cannot have. Trying to keep my mind occupied with scrapbooking. The first two weeks of a diet are the worst. Oh the cravings! Okay I digress......I am not really a "flower" user on my pages or cards, but I love this white, blue, and gray one and the pretty floral pattern flower shown in her video. Just beautiful flowers. My friend Cathy will love these. Both of us are Close To My Heart consultants and we sell and promote the Cricut cartridges. I know we have these images on one of our three cartridges without using or buying a new die. The cool thing is we can make them any size we wish using the cartridge. No limit on the size. I can already image these in many sizes and using several vintage pattern papers and attaching them on an old wooden picture frame or on the cover of a mini album. Enjoy!

Happy Scrapping............Cheryl


Wednesday, March 5, 2014

New catalog changes with Close To My Heart

Close To My Heart has just announced exciting new changes regarding our catalog. I posted them earlier on my Facebook Close To My Heart page, but thought I would share it here too. 

Great news everyone!  Close To My Heart is changing their catalog format. Effective August 2014 we will go to a "yearly catalog" instead of a bi-annual catalog. I love this new change and will be looking forward to having it in my inky little fingers this fall! The new catalog will have a finished size of 8 1/2" x 11", have 192 pages of new and creative awesomeness, and will also have a new name. With this new release, Close To My Heart will be calling their annual catalogs "Annual Inspirations". The new roll out will start in August 2014 and will be current through August 2015! Our new catalog will also offer twelve brand new "Stamp of the Month" stamp sets and nine new, delicious paper collections with cordinating accessories! Want some more great news? We will also be adding TWO 32 page seasonal books along with our annual catalog. These will be called our "Seasonal Expressions." The first book will be released in December 2014 and the second one to follow in April 2015. So now we will have more reasons to love our Close To My Heart products. 

Want to earn the new Artbooking Cricut Cartridge at 50% off or receive free product?  I would love to show you how. Please contact me at carbo5249@aol.com or if you prefer to shop, you may go to "Cheryl's Gathering" on my Close To My Heart website and place your order there. 

Happy Scrappin!


Monday, February 17, 2014

My Most Popular Post Challenge

I was challenged to repeat a post of mine that received the most views and to mention the number of views it received. My most viewed post was from my Anniversary mini album that I posted in September for the Flamingo Scraps Blog. It received a total of 144 views. Thanks everyone!! I have included this post from September 24, 2013 below. Now, I am going to challenge Cathy Derouche to post her most popular post!


                                Happy Anniversary To Me

It's hard to believe, but tomorrow I will be married for thirty-seven years. Thirty-seven wonderful years with my one and only. I met Rick when we both worked at JC Penney. Honest to God, the very first time I saw him, I told one of my friends, that also worked there, that he would be my future husband. Rick would come over to my department at the end of the evening and make small talk . One day he hung around after we closed and said "When are you going to go out with me?" and I responded "When are you going to ask me?" We had our first date the end of January, he asked me to marry him in May, and we married in September. I have had the most wonderful, blessed life with Rick. Looking back we both say our early years with raising our kids and making ends meet, were some of our best days and happiest moments. I found a sign and we have it hanging in our living room. "If I had my life to do all over again, I would meet you sooner, so I could love you longer" 
 
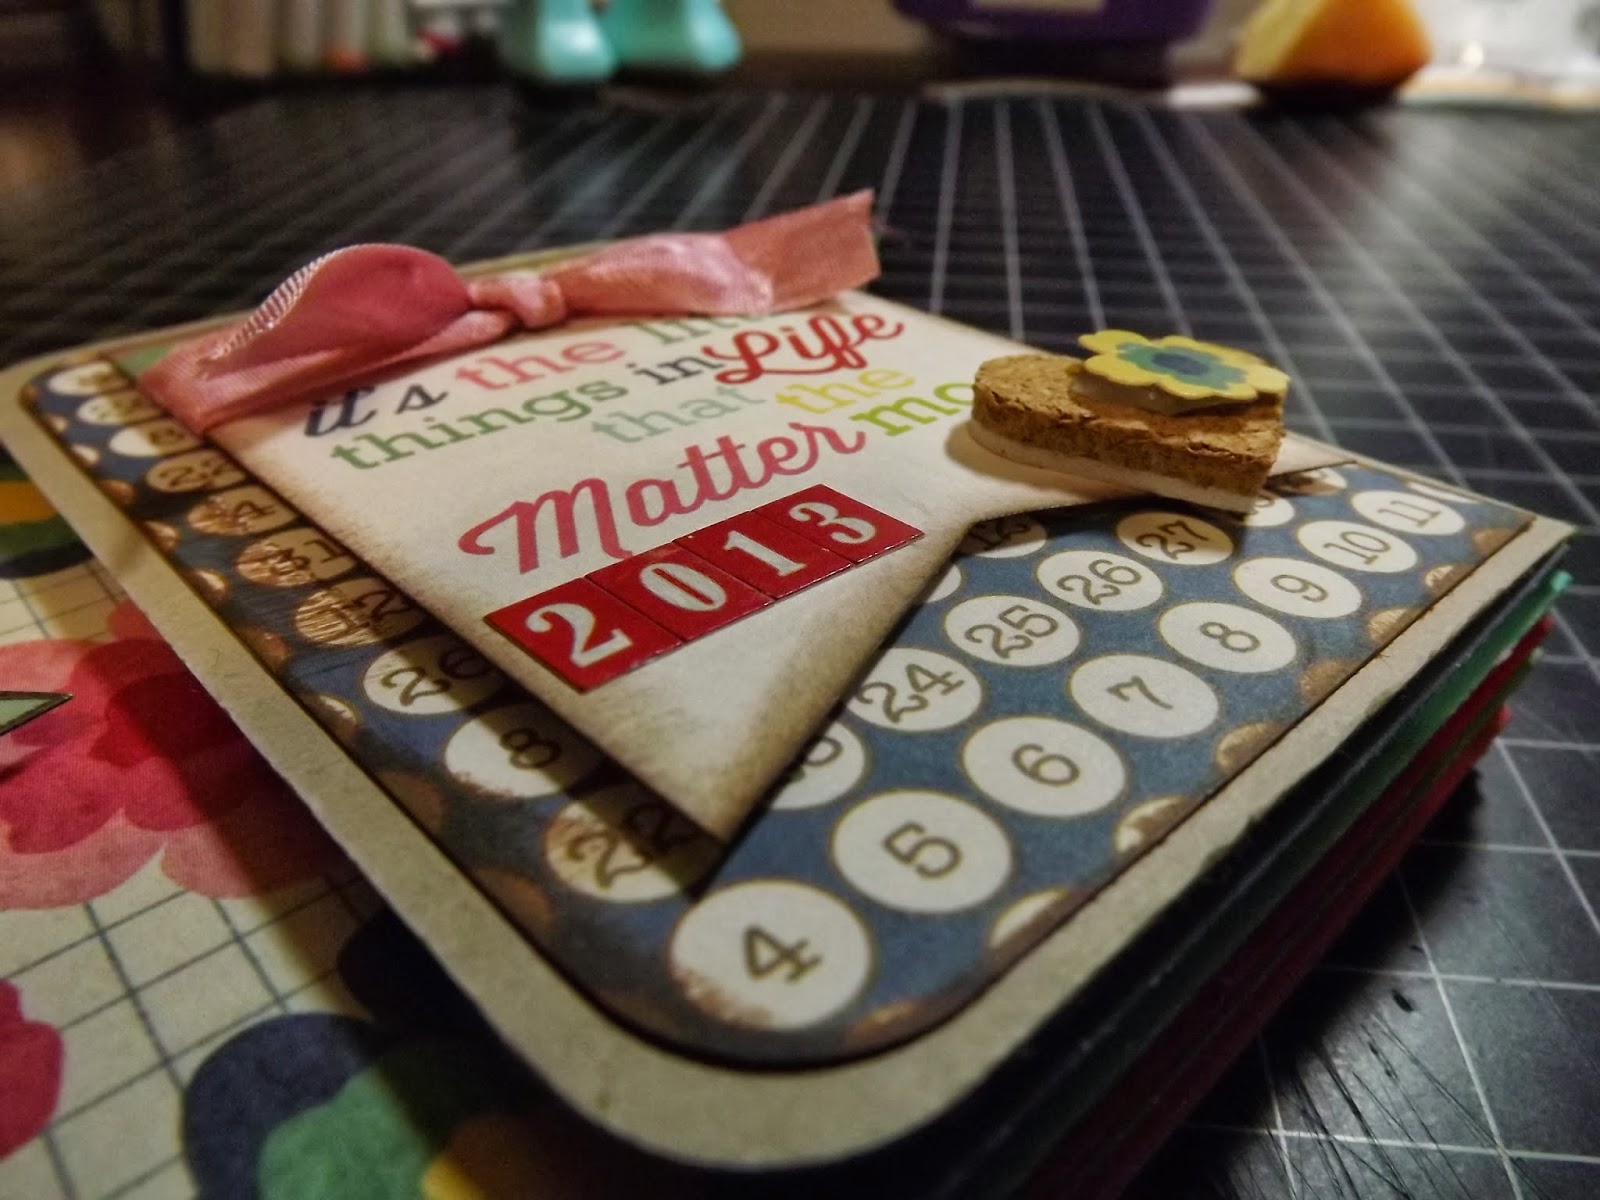
When I saw the Echo Park "Beautiful Life" paper collection in the Flamingo Scraps online store, I knew I wanted to make a small mini album for our upcoming anniversary. I wanted to keep it simple with lot's of room for pictures and journaling. I started with a 12" x 12" piece of designer paper and cut it down to 9.25" x 11". On the 9.25" width I scored it at 2.50" and 6.75". On the 11" width it is scored at 5/8", 7", and 7.75". After trimming away both two opposite ends on the 5/8" score line and removing both sides starting at the 7" score line to the ends, I rounded the corners of both opposite flaps and folded the center section together using the scored lines, and then brought the 5/8" tab up pressing firmly after applying adhesive.
 
 
The liners for the outside and inside cover measured 4" x 1/2", 3" x 4", and 4" x 6 1/8". 


For my inside pages I used the coordinating solid card stock measuring 12" x 12".  I trimmed five of these to 7" x 9.25" and then scored them on the 9.25" width 2.50", and 6.75". On the 7" width at the 5/8". My liners measured 4" x 6 1/8" and followed the same instructions as the cover.


 Once assembled I used a 1 3/8" circle punch and cut a half circle out from each page for each 4" x 6" mat that was inserted into each pocket.


I inked the edges on all of the liners and mats. On each mat I used a small double hole punch and tied a bow using several pieces from the seam binding sampler. I used my Bind It All and bound the mini with a brown coil.
 

I used the plentiful supply of coordinating stickers to decorate the mini using mounting tape and then one magnetic closure for the cover.


This was a very easy, non fussy, non complicated, but sweet album to make. The papers were so pretty that other than inking the edges using my favorite PrimaDark Rust chalk ink, seam binding, coordinating stickers, Heidi Swapp Banners, and the Fancy Pants Cork Hearts, the paper collection spoke for itself.
 
I hope you have enjoyed visiting my blog today. While you are here, I would also love for you to subscribe by email. Also I would love for you to follow the Flamingo Scraps Blog here, to like their Facebook page click here, or if you are interested in buying this paper collection, or anything I used to make this mini, you can find ithere in the store.
 
HAPPY SCRAPPIN!
 

Thursday, February 13, 2014

Valentine Card

Last night I was going through my blog, intent on cleaning things up. Earlier I found a couple blog entries that were pending to be posted. One of them was for the Cuttin and Stampin Design Team I was on in 2013. I found this cute Valentine card I created in December. It was made using the "Love Struck" Paper Smooches Stamp set. You can buy these stamps and other scrapping items here in the Cuttin and Stampin online store. My card base is my favorite, a top fold card using "Naturals White" card stock from Stampin Up and VersaFine Onyx Black from Tsukineko, my favorite go to black ink for stamping. Enjoy!!


Happy Scrappin.............Cheryl


Wednesday, February 12, 2014

George's Penguin Valentine Card Box

Okay...two Valentine Card Boxes are now history. One for Madison and another for George. So sad that Alex's school no longer have Holiday parties. These young years pass way too fast. Who would think I have a thirty four and thirty year old? Where have the years gone? With George's box, it was done the same way as Madison's. I covered a garbage bag box I was given with black paper and went from there. I am not sure which one I like better the Penguin or the Owl. You can see the Owl here on my blog in an earlier post. Enjoy!


Happy Scrappin.........Cheryl


Monday, February 10, 2014

Madison's Valentine Card Box

My daughter brought over a shoe box this weekend and asked that I make my five year old Grand, Madison a Valentine Card Box for her party at school this Friday. Actually she brought over two. One was for Madison's best friend George. It has been years since I have had to make one of these, but if it involves paper, inks, and glue and I am all over it! Here is the first box I made. I am just now starting on George's. This was a lot of fun to make. I am sooo thankful and blessed to live close to my family once again. Enjoy!


I started off with a cut flowered shoe box. It was so cute already, I hate to cover it up


Added a few layers of border cut dies


Added a layer inside the box to make it all pretty for when the box was opened. Added a heart punch for the nose. I covered a foam heart with paper, cut it in half and used it for the wings with a little bling to the wings, Not sure if an owl has blue eyes or not. but this ones does. 


I totally messed up on the eye lashes. I had the box turned around for me to get to the eyes easier and never thought about the direction of the lashes and it was too late to go back and repair. Too many layers on top of the thin red wrapping paper. I would have had to totally start from scratch on the front of the box. Maybe these five and six year olds will never notice!


Added a bow and her name with some glitter alphabets and her box is finished.


Now onto box #2!! 

Happy Scrappin...........Cheryl

Catalog Delivery Schedule

"As a measure to help minimize the effects of the ongoing supply chain difficulties, CTMH will be transitioning back to a three-month c...