Wednesday, October 30, 2013

Cuttin' & Stampin' Weekly Challenge #43


#43
Challenge:  Autumn Harvest

October 29 - November 4, 2013


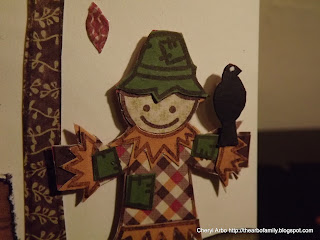
Hi..this is Cheryl.  For todays challenge we were given the Paper Smooches stamp set "Autumn Groves".  It was a pleasure to use this stamp set. I love fall  and all of the leaves, pumpkins, and scarecrows that comes with it. This stamp set has it all and more. To start off with my card.....you guessed it. I used a top fold A2 card. This card took me much longer to create and assemble because I spent a lot of time stamping on random patterned papers and fussy cutting. I do love to fussy cut! My biggest challenge in the end were the darn birds in the sky. I probably should have left them off or added them at the beginning of my card. Not exactly what I was going for, but it was too late to change anything. Here are a few up closeup views of my card. This was a lot of fun to make. Enjoy!


and here are those darn birds! What was I thinking? lol


And here is my card. Happy Fall Y'all!


Thank you for stopping by my blog today. I would love for you to check out the Cuttin' and Stampin Blog here and to "like" their Facebook group here. If you would like to check out the dozens of adorable Paper Smooches clear stamps and coordinating dies on their online store also, please click here

Happy Stampin! ........Cheryl

Please make sure your creation post has a link back to Cuttin' and Stampin'

Thanks for playing along we will be announcing the winners on November 8, 2013.


Sunday, October 27, 2013

Cuttin' & Stampin" Weekly Challenge #42

#42
Challenge:  Color Challenge
Orange, Purple, Green & Black
October 22 - 28, 2013

Hi guys.....this is Cheryl. For this weeks challenge with Cuttin' and Stampin' we were given the adorable Falling For You stamp set and coordinating dies from Paper Smooches with instructions to use a black, orange, green, and purple cardstock for our project.


Well, anyone that knows me already knows these are some of my favorite colors. I love fall colors with the beautiful browns, greens, oranges, reds, and yellows. Orange being my most favorite color of them all. The more I make cards I am slowly realizing for me I love working with solid colors and smaller prints and let the stamps do the talking.

For my project I started out with a piece of black card stock cut down to 4.25" x 11". It was then scored at 1/2", 1.25", 2", and 6.50".  I folded on all of the scored lines with the exception of the 1.25" line. This will only be used if you mail your picture frame. This score line will allow you to fold the frame flat in order to fit in an envelope for mailing.


For the inside I cut a layer measuring 4" x 4.25" and adhered this down. For the front of the frame I used my oval Spellbinder dies and cut three desending sized ovals frames and matted them together.


I then used a tree limb from my Paper Smooches Autumn Grove stamp set (that you will see on a later project) and stamped this on a gray tone paper and fussy cut it. I also stamped my bat on a pattern paper and used the coordinating die to cut it out. Googly eyes were adhered to the bat....he is sooo cute!


From there just a splash of color using a few punched hearts. I also matted the verse from the Falling for You stamp set on the bottom of the frame with the same paper that I used to make one of the hearts with. I then added some Glossy Accents on the three hearts.


 Lastly I added a heavy adhesive along the outside of the initial 1/2" score line and attached it to the inside of the opposite end of the triangle shaped frame.


 I am going to use this for a picture of my Grands from Halloween, but it could be used as a card if you choose too also.


That is it! I totally love this frame and plan on making these into a Christmas themed picture frames for my Grands to attach a picture of themselve and give to our family.


Well, I hope you have enjoyed my project as much as I do. As always I would love for you to subscribe to the Cuttin' and Stampin" Blog here, to "like" their Facebook page please click here, and if you would like to shop and purchase one of these adorable Paper Smooches stamp or die sets too, please go to the Cuttin' and Stampin" online store here.

HAPPY SCRAPPIN! .........Cheryl

Please make sure your creation post has a link back to Cuttin' and Stampin'

Thanks for playing along we will be announcing the winners on November 1, 2013.

Please link your projects below.

Friday, October 25, 2013

Flamingo 4


Hey guys...this is Cheryl. Today on the Flamingo Scraps Designer Team, there are four of us all working hard using the same scrappin goodies and doing our own thing making something pretty! We were given a generous supply of Prima "Rondelle" Designer Paper, a Prima Banner Clip, two Prima flowers, and a small manilla tag to create our project. At first I debated on making a card, but having all of these nice papers, I wanted to do something where I could show several of these pretty papers on the same project. So, I decided to make a A2 size card portfolio.

I started off with a piece of black 12" x 12" cardstock from my stash, trimmed it down to 8.50" x 11".  I scored it 5.25" and 5.75" on the 11" width and 6" and 6.25" on the 8.50" width. I trimmed away the 1/2" middle section from the bottom short end up to the top score line.


Using an assortment of patterns from the Prima Rondelle collection, I cut two at 5" x 5.75", two at 2" x 5", and one at 1/4" x 5.75". After inking all of the edges, adhesive was applied to the back of each piece and adherred to the front cover and inside flaps.


Turning it over I marked a 2.25" line above the top score line along the 11" width. From there I added scor-tape along this drawn line and then after folding a 30" piece of ribbon in half to find the center, I laid the center of a ribbon from my stash on the 1/2" area and attached it to the front cover of the portfolio.


At this point I creased my score lines and from the inside I brought both flaps foward and secured the outside edges with a tiny brad as a clousure.


I covered the tag with another paper piece of the paper, and then cut two additional tags out from the collection, along with two other papers for two additonal mats on the cover, and then tied some ribbon from the Seam Binding Sampler on the tags and used the Prima flowers to embellish the cover and I was done.


This was a fun project to make and a great gift idea to hold four handmade cards, which I will do on another project.  Here is my completed card portfolio. This was a lot of fun and hopefully I have inspired you to make one for your handmade cards.

 
As always I appreciate you visiting and subscribing to my blog. I would love for you to also "like" and subscribe to Flamingo Scraps on Facebook here and if you would care to do a little shopping in their online store, you can click here. While there check out all of the latest products from Pink Paislee, Heidi Swapp, Fancy Pants, and Basic Grey.....just to tease you with a few!!
 
Happy scrappin!.......Cheryl


Wednesday, October 16, 2013

October Card Swap

Hi, this is Cheryl. Just a quick post to show you a fall card I made for one of my October card swaps. This is the main thing I love about our card swap.....inspiration! It is a great way to get back in your scraproom and get busy. For my card I used a dark brown cardstock for the base layer, which measures 4.25" x 11" scored at 5.50". Basically this is my most favorite "top fold" card just turned on it's side. I then used a cream corrugated piece cut 1/4" smaller than the brown base layer. I cut another brown piece at 3.75" x 5" with a cream piece of cardstock layered 1/4" smaller on top. The edges of this top piece was inked. I used a large grass stamp and just inked the top ends on the cream cardstock. I used an adorable retired stamp set from Close To My Heart called "So Grateful" for both my  pumpkin and verse. It is nice when you are scrapbooking or card making just for fun and want to create something that makes your happy.  It's very relaxing and enjoyable when you don't have to be concerned if it is a retired stamp or older paper collection. You can pull out your much loved stamps and papers and just enjoy!


These were stamped using Close To My Hearts "Goldrush" and Chocolate inks. From there I finished it off with a taffeta bow on the side. A quick and easy, but cute fall card. I am thinking I might make my Thanksgiving Cards on the order of this, but will use all current Close To My Heart products just in case someone likes it and wants to place an order and help this ol' gal make her quarterly requirements! lol  You can check out all of the items available and find out about getting "free" items in our NEW Holiday Mini here. I need to add too that this taffeta was actually from a recent retreat I went to at Very Vintage LLC.  The owners decorated our scrapping tables using this and a caramel apple. I was going to leave it there until I looked around and saw how they used it on several cute fall decorations. I have never used it before, but I am sold on it now!


Happy Scrappin! ........Cheryl

Monday, October 14, 2013

National Breast Awareness Month

#40
Challenge:   Breast Cancer Awareness
October 8 - 14th, 2013
Design Team Inspiration
 
Hi Cheryl here. As you know, October is National Breast Awarness Month. In honor of this the Design Team for Cuttin' and Stampin' are all doing a project this month. Both my family and my husband's have had their share of  cancers, but to date we have been blessed not to have a family member with breast cancer. When I was asked to participate this month, it really made me realize what an important month October is to our sisterhood. With the heightened awareness of this dreadful disease maybe this will make all woman more aware and remind them of how important our mammograms and monthly self breast exams are. For my project I was given the "Hope" stamp set from Paper Smooches. It is a very sweet set of stamps that are full of encourgement, hope, and support for anyone diagnosed with or a survivor of Breast Cancer. It also has a cordinating die set.

I started off with an A2 size card, which measures 5.50" x 11", scored at 4.25". I decided to make a "Triple Time Stamping" card. I am sure there are many names for this type of card, but I got my name for this card and the inspiration for it by my friend Dawn Olchefske. If you are interested, here is a link to her YouTube video showing how she made her card. For my layers I used my card base and a top layer measuring 4" x 5.25", two middle layers measuring 3" x 4.25" and 3.25" x 4.50", and my top two layers measureing 2" x 3.25" and 2.25" x 3.50"


I gathered all three top layers and placed a small dot of adhesive between the layers to hold the papers while I stamped. I stamped my verse and the glove first using a bold black ink, and then stamped the glove on another pink solid print.. Fussy cut it out and then used a pop dot and added it above my previous stamped glove image. I then used the largest ribbon stamp and stamped all across the attached papers using a pink ink, then moved down to the smaller stamp, and then lastly to the smallest stamp filling in any open area.


Afterwards I separated these three layers, and being careful to keep them in the same stamped order, I matted each layer together until I had three joined layers.


My heart goes out to anyone that has or has been treated for breast cancer. I am proud that our Country has October as the month for breast cancer awareness. Each one of us stay so busy taking care and providing for our families. Sometimes we need to be reminded that we have to take care of ourselves too.

If you would like to follow and like the Cuttin' and Stampin' facebook page, please click here. If you would like to shop on the online store, you may click the link here. The shopping options are to the right. Tammy has tons of Paper Smooches Stamps and coordinating dies just waiting to go home with you!

Thank you for visiting the Cuttin' and Stampin' Blog today. I hope you will return each day this month and see what each one on the Design Team has also made in honor of this most important day.

We hope you'll join us and make a project for Breast Cancer Awareness.  It could be a scrapbook page, card, etc.  You can link your project here.
 
Please make sure your creation post has a link back to Cuttin' and Stampin'
 
Thanks for playing along!  We will be announcing the winners on October 18 2013.

Happy Scrappin......Cheryl


Friday, October 11, 2013

No Scary Treats Here.....

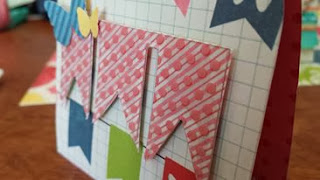
Hi guys. This is Cheryl. I am totally loving this time of year with the falling leaves, homemade soups, and cooler temperatures. My plants and flowers act like they are on steroids. They are growing and blooming like crazy. Typically we have just as many Fall, pumpkin, and Halloween decorations at our house as we do for Christmas in December. It doesn't hurt that orange is my favorite color. My daughter's neighborhood has a yearly Halloween Trick or Treat party and cook out. The kids all stay within their street safely together. Last year I just moved here the end of September and with tons of unpacking to do, I only had a short time to prepare for Halloween. This year I have already started making treat holders for the kids. As I was making a few I got thinking that these would be a great idea for any time during the year and a cute project for my scrapping buddies.

To get started I cut four 3.50" x 10" pieces of the Echo Park Beautiful Life paper collection. I folded the strips in half in order to cut two at one time and ran them through my Big Shot using a tag die from my stash. They were all scored 1" from the flat end.


I then added a strong adhesive on the inside of the 1" scored area to one of the two coordinating pieces and adhered them together.


To decorate the front, I inked several stickers using my favorite Prima Dark Rust chalk ink from the coordinating sticker sheet of the Wonderful Life collection,


I added a few of the ribbons from Webster's Pages Color Sunday Picnic collection, a banner from Heidi Swapp, and a couple 5" ribbons from my stash as a closure.


Prior to threading the ribbons through the top, I also applied a strip of adhesive to the top layer of the two attached pieces and adhered candy to this strip.


And that is it! I thought these would be perfect for some of my scrappin' friends as a nice change from receiving so many Halloween-themed gifts.
 

I hope you have enjoyed my project for today. These were fun and quick to make. Now I have to get rid of these fast. It is dangerous for me to be alone with chocolate in my house! lol

As always thank you for visiting my blog. If you would like to visit the Flamingo Scraps Blog, please click here. If you would like to buy any of the papers, inks, banners, or ribbons used, please visit the Flamingo Scraps online store here, and to like their Facebook page please click here.

Happy Scrappin......Cheryl


Thursday, October 3, 2013

Alabama....oh yea!


Hi...this is Cheryl. Anyone like college football? My family and me just love it. There was a cute post on Facebook a few weeks back saying something like "I am sweet as spice until college football begins" That is me to a T. I just cannot help it. I have always enjoyed watching college football on TV with my Dad and now my husband, but more so since we have moved to Texas. When they show Tuscaloosa, the beautiful champus, and my Bama Boys hit the field...it's time to get loud, rowdy, and yell "Roll Tide!"  Win or lose, we pull for and love Bama!

For my card today I used a scrap piece of black card stock and a top fold card, which measures 4.25" x 11" and scored at 5.50". I cut and inked a piece of the Teresa Collins "Now & Then" designer paper at  3 7/8" x 5 3/8" and added this over the card base, I cut and inked another piece of designer paper at 2" x 3 7/8", and adherred it across the front of the card. I then cut a small 4" piece of the Heidi Swapp banner and glued it to the top edge on my card.


In my stash I found an old football stamp which worked perfect for this card and stamped it in my favorite Prima Dark Rust chalk ink on a scrap of the paper used as my base layer. Have you seen these cool new NCAA stamps made by Clearsnap this year? Just love them and of course I had to get the set with Alabama on them! I stamped the "Alabama Crimson Tide" verse along the bottom of the card,


used another stamp and fussy cut the elephant,and layered it on the football.


The last thing was to tie a knot bow using a black and white gingham on the bottom of the card and I was done!


There are two inks that can be purchased for these stamps. The one I used is the dye ink for paper, but I also have a temporary tattoo ink that can be used on skin. For our first game of the season this year we all sported a variety of tattoo's on our face, arms, and legs. My two Grands thought it was the coolest thing. These stamps are available in most college teams and can be ordered online and delivered to your home by going to the Flamingo Scraps online store here.

I hope you have enjoyed my card for today. For you to receive all of my posts, I would love for you to subscribe to my blog. To subscribe to the Flamingo Scraps Blog you can click here, to shop and purchase anything I have used today from the Flamingo Scraps onine store you can go click here, and lastly I would love for you to "like" and follow the Flamingo Scraps Facebook Page here.

Happy Scrappin.....Cheryl


Catalog Delivery Schedule

"As a measure to help minimize the effects of the ongoing supply chain difficulties, CTMH will be transitioning back to a three-month c...